MKL’s ’98 1200C – Yost Power Tube Master Kit Rev. 1 Type L for Kehin CV Carb
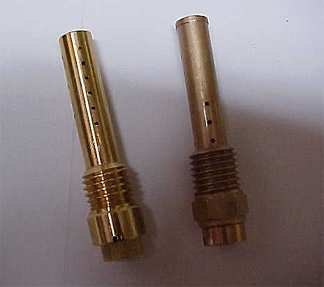
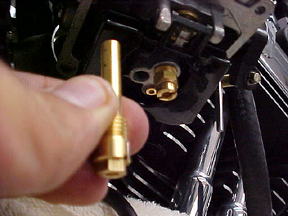
Yost Performance Tube and jet on the left, stock emulsion tube and jet on the right 11/02
Revisiting the Yost Power Tube: Installing the original Yost Power Tube Master Kit in my CV was my first self-completed performance project, and the first product review on this site back in December 1998. Since that time, Yost has completely redesigned the kit to “Rev. 1” level, rendering my original review outdated and prompting a retest. Since I run now a Mikuni, a neighbor’s new 2002 Pearl White 1200 Custom which we had converted to Stage I (S/E air cleaner, CV rejetted to 45 slow / 175 main, idle mixture at 2.5 turns out, and V&H Straightshots with baffles) served as the test mule for this review. The bike had a hair over 1,200 miles on it as of this test.
Components: The new “Rev. 1” kit differs from the old Master kit in several ways, the most obvious being the needles. The old Master kit had one completely red anodized needle, whereas the new Rev. 1 kit gives the tuner a choice of two needles, red and blue, both anodized only at the top near the clip. The rest of the needles are bare metal. Both of the new needles have obviously different tapers from each other, from the old Master kit needle, and from the stock needle found in the ’02 Custom. The new blue needle is intended for most general purpose and mildly modified applications (including high port velocity velocity heads), while the red needle is intended for more fuel-intensive applications, such as modified large displacement engines. According to Yost, the blue needle is ideal for all but the most extreme Sportster applications. For reference, the needles we’re comparing for general Sportster use are as shown below:
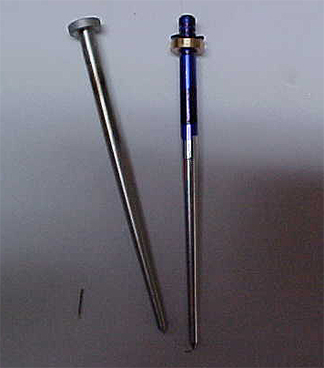
Stock ’02 CV needle on the left, Yost blue needle on the right (clip in middle position with included brass washer underneath) 11/02
The heart of the new kit is of course the emulsion tube, as shown above at the top of this page. It differs from the stock tube by having more tiny holes, in different locations, for a finer overall mist. Also included is a lighter slide spring (slightly thinner material than stock), a variety of jets (165, 175, 185, 195), and some drill bits to enlarge the needle hole and vacuum port on the bottom of the slide. See below for pictures and further explanation:
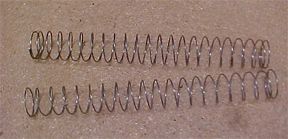
Stock slide spring on top, lighter Yost spring on bottom 11/02
The slide must be modified to accept the thicker Yost needle, so the needle hole must be drilled out with the supplied 1/8″ drill bit. The vacuum port can also be drilled, and Yost recommends drilling this hole with the same 1/8″ bit for most applications. The Rev. 1 kit also includes a 7/64″ bit to drill the port for use on very heavy touring bikes, or very high altitude applications. However, we know from previous experiments that oversizing the vacuum port for one’s application leads to erratic surging and flat spot conditions, so the rule here for most Sportsters is to either leave the port alone, or to drill no larger than 1/8″. For the photo below, we compare the stock slide from the ’02 Custom on the right to my old CV slide shown on the left, where both holes were already drilled 1/8″ for the old Yost kit. Obviously, the vacuum port is the more dramatic change of the two holes.
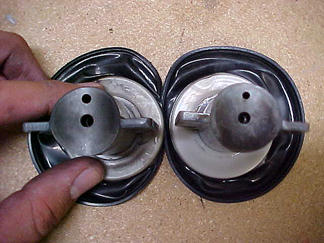
Modified slide on the left, stock slide on the right 11/02
Installation: For the CV kit, the installation takes place in two steps. The whole thing can be done carefully by a novice in about 45 minutes, without removing the carb from the bike. In short, we’re going to pop the carb off of the intake manifold and let it dangle by the cables, while we enter the bottom and top portions of the CV. The easier part of the operation is the bottom portion, where we replace the stock emulsion tube and jet with the Yost emulsion tube and corresponding jet. In this case, since the bike was jetted properly for a general purpose Stage I application, we will use the same size main jet as before (175). The slow jet is unchanged. Simply remove the float bowl, swap the emulsion tubes and jets, and put the float bowl back on. I recommend replacing the soft, easily stripped screws holding the float bowl on with some stainless steel 3mm allen heads, available at any hardware store. You will thank yourself for this later. See below:
Take out the stock emulsion tube and jet, and replace with Yost unit 11/02
The top part of the carb is slightly more involved. We’re going to take the top cover off of the CV, and take the slide assembly out for the drilling mod. Then, we’re going to put it back in place, replacing the stock spring and needle with the Yost units on reassembly. Leave the needle clip in the middle position, with the brass washer under the clip, for most applications. See my article How to Replace the CV Carb’s Top Cover Without Ruining the Delicate Diaphragm (1-02) for carb top assembly reference.
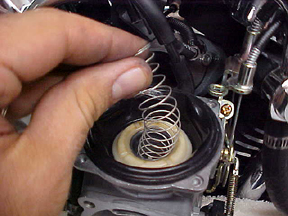
Don’t forget the spring! The top end of the CV carb gets a Yost makeover with modified slide, new blue needle, and lighter spring 11/02
Now pop the carb back on the manifold, after coating the rubber flange seal in some lubricant (I use silicone spray or WD40). Make sure your vacuum line is securely on the carb, verify cable operation, and reassemble the air cleaner assembly as usual.
Testing and Results: The owner of the test mule had no intentions of subjecting his spankin’ new scoot to a dyno run, so the test run was made using the seat ‘o the pants meter. For reference, his riding style is weekend back road cruising and general purpose short distance riding. The test runs consisted of the usual blasts through the local back roads, complete with some long roll-ons on wide straightaways. Following the runs, the bike’s owner reported that:
A) The throttle response was improved, and that the motor felt more responsive to throttle manipulation.
B) The bike seemed to improve most in the mid range, and roll ons in higher gears were especially improved with the addition of the kit. The idling and low-rpm behavior seem unchanged.
C) Fuel economy seems to be unchanged.